Introduction
Approval Testing
Approval testing is a technique that allows you to compare the output of your code with a known good/previously approved output.
An approval test case will only succeed if the actual received output is equal to the previously approved output.
If the received output is different from the approved output, the test will fail and leave it to a human reviewer to approve the received output or to fix the code.
Approval testing is especially useful when:
-
You are testing complex objects or large data sets, where writing individual assertions for each property would be impractical and fragile.
-
You want to catch unintended changes in serialized output (JSON, XML, YAML, etc.).
-
You are testing against legacy code where the expected output is hard to describe with assertions but easy to verify visually.
-
You want to replace long chains of
assertEqualscalls with a single, readable golden master file.
Consider testing a method that returns a summary object:
public record OrderSummary(
    String orderId,
    String customerName,
    String shippingAddress,
    List<String> items,
    int itemCount,
    double subtotal,
    double tax,
    double total,
    String status) {}
With traditional assertions, you need to check each field individually — and it’s easy to miss one:
OrderSummary order = createOrderSummary();

assertThat(order.orderId()).isEqualTo("ORD-12345");
assertThat(order.customerName()).isEqualTo("Jane Smith");
assertThat(order.shippingAddress()).isEqualTo("123 Main St, Springfield");
assertThat(order.items()).containsExactly("Widget A", "Gadget B", "Doohickey C");
assertThat(order.itemCount()).isEqualTo(3);
assertThat(order.subtotal()).isEqualTo(59.97);
assertThat(order.tax()).isEqualTo(4.80);
// missing: total (1)
assertThat(order.status()).isEqualTo("confirmed");val order = createOrderSummary()
assertThat(order.orderId()).isEqualTo("ORD-12345")
assertThat(order.customerName()).isEqualTo("Jane Smith")
assertThat(order.shippingAddress()).isEqualTo("123 Main St, Springfield")
assertThat(order.items()).containsExactly("Widget A", "Gadget B", "Doohickey C")
assertThat(order.itemCount()).isEqualTo(3)
assertThat(order.subtotal()).isEqualTo(59.97)
assertThat(order.tax()).isEqualTo(4.80)
// missing: total (1)
assertThat(order.status()).isEqualTo("confirmed")| 1 | The total field is never checked — the compiler won’t catch this. |
With approval testing, the entire object is captured automatically:
OrderSummary order = createOrderSummary();

approve(order).printedAs(multiLineString()).byFile();val order = createOrderSummary()
approve(order).printedAs(multiLineString()).byFile()The approved file contains every field, making missing checks impossible:
OrderSummary [
  orderId=ORD-12345,
  customerName=Jane Smith,
  shippingAddress=123 Main St, Springfield,
  items=[
    Widget A,
    Gadget B,
    Doohickey C
  ],
  itemCount=3,
  subtotal=59.97,
  tax=4.8,
  total=64.77,
  status=confirmed
]
ApproveJ
ApproveJ is a Java implementation of approval testing with a builder-based fluent API, several built-in tools, and optional extension points.
-
No dependencies in the core module — works with any JVM project.
-
Fluent builder API — chain printing, scrubbing, and approval in a single expression.
-
Extensible — bring your own print formats, scrubbers, and reviewers, or use the built-in ones for JSON, YAML, and HTTP.
-
IDE-friendly — approved files live next to your tests, with correct file extensions for syntax highlighting.
To review the code, file issues or suggest changes, please visit the project’s GitHub page.
Getting Started
Requirements
In order to use ApproveJ you need a JDK 21 or higher.
Dependencies
To use ApproveJ in your own project, you need to add it as a dependency.
testImplementation 'org.approvej:core:1.5.1'testImplementation("org.approvej:core:1.5.1")<dependency>
<groupId>org.approvej</groupId>
<artifactId>core</artifactId>
<version>1.5.1</version>
<scope>test</scope>
</dependency>Bill of Materials (BOM)
If you want to use more than one module in the same project, you can use ApproveJ’s bill of materials (BOM) and omit the explicit version for the other modules.
implementation platform('org.approvej:bom:1.5.1')
implementation 'org.approvej:json-jackson'implementation(platform("org.approvej:bom:1.5.1"))
implementation("org.approvej:json-jackson")<project>
<!--…-->
<dependencyManagement>
<dependencies>
<dependency>
<groupId>org.approvej</groupId>
<artifactId>bom</artifactId>
<version>1.5.1</version>
<type>pom</type>
<scope>import</scope>
</dependency>
</dependencies>
</dependencyManagement>
<!-- … -->
<dependencies>
<dependency>
<groupId>org.approvej</groupId>
<artifactId>json-jackson</artifactId>
</dependency>
</dependencies>
<!-- … -->
</project>IDE Support
If you use IntelliJ IDEA, install the ApproveJ plugin for integrated diff viewing, one-click approval, and navigation between tests and approved files. See IntelliJ Plugin — IDE Integration for details.
Basics — Your First Approval Test
The general entry point to start an approval is the static initializer approve of the ApprovalBuilder.
It takes the object which you want to approve as an argument and returns a builder to configure the approval with a fluent API.
Approve Strings
If you have anything that returns an arbitrary string, you can simply build an approval like this.
String result = hello("World");

approve(result) (1)
.byFile(); (2)val result = hello("World")
approve(result) (1)
.byFile() (2)| 1 | creates an ApprovalBuilder<String> |
| 2 | compares result to a previously approved value stored in a file next to the test and fails the test if the result differs |
Executing such a test will create two files next to the test code file named like <TestClass>-<testMethod>-received.txt and <TestClass>-<testMethod>-approved.txt.
For nested or inner test classes, <TestClass> includes enclosing class names separated by dots (e.g. OuterTest.InnerTest).
The received file will always contain a string representation of the object you want to approve at the last execution.
The approved file will be empty at first. You can use a diff tool of your choice to compare the two files and merge values that you want to approve. If the received value equals the content of the approved file, the received file will be deleted automatically.
Hello, World!You can adjust various details of this process:
Approve POJOs
Of course, you might want to approve more complex objects than just strings.
For example, a simple POJO like this.
public record Person(String name, LocalDate birthDate) {}By default, ApproveJ will simply call the object’s toString method to turn the object into a string just before approving it.
Person person = createPerson("John Doe", LocalDate.of(1990, 1, 1));

approve(person) (1)
.byFile();val person = createPerson("John Doe", LocalDate.of(1990, 1, 1))
approve(person) (1)
.byFile()| 1 | creates an ApprovalBuilder<Person> to approve the person |
Will approve the following value:
Person[name=John Doe, birthDate=1990-01-01]See Printing — Customize How Values Are Turned into Strings if you need a more sophisticated way of printing.
Named Approvals — Approve Multiple Values per Test Case
Optionally, you can assign a specific name for an approval. When you Approve by File the chosen name will be added to the filename to help identify the specific approval. It is also necessary to assign a name if there are multiple approvals per test case, as otherwise later approvals will overwrite earlier ones.
Person jane = createPerson("Jane Doe", LocalDate.of(1990, 1, 1));
Person john = createPerson("John Doe", LocalDate.of(2012, 6, 2));

approve(jane).named("jane").byFile();
approve(john).named("john").byFile();val jane = createPerson("Jane Doe", LocalDate.of(1990, 1, 1))
val john = createPerson("John Doe", LocalDate.of(2012, 6, 2))
approve(jane).named("jane").byFile()
approve(john).named("john").byFile()This test generates two sets of files
-
<TestClass>-<testMethod>-jane-<received/approved>.txt
-
<TestClass>-<testMethod>-john-<received/approved>.txt
Printing — Customize How Values Are Turned into Strings
While some toString implementations already are quite good, they typically return a one-liner.
This is fine as long as you only have a few properties.
However, if you have a lot of properties, it is much easier to read the result if it is formatted nicely.
The most common way to change the print format is to configure a global default.
For individual overrides, you can use the printedAs method with a PrintFormat, or the printedBy method with a Function<T, String>.
In addition to the printing method, a PrintFormat also provides a filename extension that will be used if the value is written to a file (see Approve by File).
Print Each Property on Its Own Line
ApproveJ provides a generic MultiLineStringPrintFormat that will print the object with each of its properties on a new line to make comparing the result easier.
In addition to field-backed properties, it discovers getter-only properties via getXxx() and isXxx() methods (the latter only for boolean/Boolean return types, per the JavaBeans convention).
Field-backed properties appear first in declaration order, followed by getter-only properties alphabetically.
To use this format for all approvals, configure it as the default:
defaultPrintFormat = multiLineStringAlternatively, apply it to a single approval via printedAs:
Person person = createPerson("John Doe", LocalDate.of(1990, 1, 1));

approve(person)
    .printedAs(multiLineString()) (1)
.byFile();val person = createPerson("John Doe", LocalDate.of(1990, 1, 1))
approve(person)
.printedAs(multiLineString()) (1)
.byFile()| 1 | applies the MultiLineStringPrinter and returns a new ApprovalBuilder<String> |
Now the approved file will look like this
Person [
  name=John Doe,
  birthDate=1990-01-01
]
Use a Custom Function to Print
You can provide a custom Function<T, String> to the builder’s printedBy method.
Person person = createPerson("John Doe", LocalDate.of(1990, 1, 1));

approve(person)
    .printedBy(it -> String.format("%s, born %s", it.name(), it.birthDate())) (1)
.byFile();val person = createPerson("John Doe", LocalDate.of(1990, 1, 1))
approve(person)
.printedBy { "%s, born %s".format(it.name, it.birthDate) } (1)
.byFile()| 1 | applies the given Function and returns a new ApprovalBuilder<String> |
So the content of the approved file will look like this
John Doe, born 1990-01-01Implement a Reusable PrintFormat
For more complex cases, you can implement your own PrintFormat.
This will allow you to also override the filenameExtension method.
If you use a FileApprover (see Approve by File), it will be used to determine the files' filename extension.
This is useful if your Printer creates a certain format (e.g. JSON, XML, YAML, …).
E.g. the following format will print a Person as a YAML string.
public class PersonYamlPrintFormat implements PrintFormat<Person> {
  @Override
  public Printer<Person> printer() {
    return (Person person) ->
        """
        person:
          name: "%s"
          birthDate: "%s"
        """
            .formatted(person.name(), person.birthDate());
  }

  @Override
  public String filenameExtension() {
    return "yaml";
  }
}class PersonYamlPrinter : PrintFormat<Person> {
override fun printer() =
Printer<Person> { person ->
"""
person:
name: "${person.name}"
birthDate: "${person.birthDate}"
"""
.trimIndent()
}
override fun filenameExtension() = "yaml"
}The resulting file will look like this
person:
  name: "John Doe"
  birthDate: "1990-01-01"
Configure the Default Print Format Globally
Instead of calling printedAs on every approval, you can set a project-wide default in your approvej.properties:
defaultPrintFormat = multiLineStringAny built-in alias (singleLineString, multiLineString, json, yaml) or a fully-qualified class name works here.
See Configuration — Global Defaults and Environment Settings for all available configuration sources and options.
Scrubbing — Make Random Parts Static
Sometimes you might not be able to control the exact output of the object you want to approve. For example, if the result object contains a timestamp or a generated ID, you might want to ignore these for the approval.
If you can control the test data, you may prefer to use fixed values (e.g. a constant UUID or a frozen clock) instead of scrubbing. Scrubbing is the right choice when the dynamic data comes from code you do not control, or when fixing the data would make the test less realistic.
You can do this by using the scrubbedOf method of the ApprovalBuilder and provide a Scrubber/UnaryOperator<T> implementation.
Most built-in scrubbers are Scrubber<String> implementations — they work on the string representation, not on the original object.
If you are approving a POJO, you need to print first so the scrubbers can match against the resulting text.
Call printed() to apply the configured default print format, or use printedAs()/printedBy() to choose one explicitly.
|
For instance, in the following BlogPost POJO there are two generated fields:
class BlogPost {
  private final UUID id;
  private final String title;
  private final String content;
  private final Instant published;

  public BlogPost(String title, String content) {
    this.id = UUID.randomUUID(); (1)
    this.title = title;
    this.content = content;
    this.published = Instant.now(); (2)
  }

  public String title() {
    return title;
  }

  public String content() {
    return content;
  }

  public Instant published() {
    return published;
  }

  public UUID id() {
    return id;
  }

  @Override
  public String toString() {
    return "BlogPost[title=%s, content=%s, published=%s, id=%s]"
        .formatted(title, content, published, id);
  }
}| 1 | the id is a UUID that’s being generated randomly, and |
| 2 | the published is a LocalDateTime set to now. |
In the following example, the two dynamic properties are scrubbed with the built-in Scrubbers for dateTimeFormat and uuids.
var blogPost =
    createBlogPost("Latest News", "Lorem ipsum dolor sit amet, consectetur adipiscing elit.");

approve(blogPost)
    .printedAs(multiLineString())
    .scrubbedOf(dateTimeFormat("yyyy-MM-dd'T'HH:mm:ss.SSSX")) (1)
    .scrubbedOf(uuids()) (2)
.byFile(); (3)val blogPost =
createBlogPost("Latest News", "Lorem ipsum dolor sit amet, consectetur adipiscing elit.")
approve(blogPost)
.printedAs(multiLineString())
.scrubbedOf(dateTimeFormat("yyyy-MM-dd'T'HH:mm:ss.SSSX")) (1)
.scrubbedOf(uuids()) (2)
.byFile()| 1 | replaces the published date with a numbered placeholder |
| 2 | replaces the id UUID with a numbered placeholder |
| 3 | so that the approved result looks like this |
BlogPost [
  id=[uuid 1],
  title=Latest News,
  content=Lorem ipsum dolor sit amet, consectetur adipiscing elit.,
  published=[datetime 1]
]
Available Built-in Scrubbers
String Scrubbers
| Factory Method | Description | Example Match |
|---|---|---|
|
Scrubs exact occurrences of the given strings. Useful when dynamic values are known upfront (e.g. from test setup). |
|
|
Scrubs all substrings matching a regular expression. |
|
|
Scrubs UUID strings. |
|
Date/Time Scrubbers
All date/time scrubbers use a DateTimeFormatter pattern internally to generate a matching regex.
Use dateTimeFormat(pattern) for custom patterns, or one of the pre-configured methods below.
| Factory Method | Description | Example Match |
|---|---|---|
|
Scrubs date/time strings matching a |
|
|
Same as above with a specific locale for locale-sensitive patterns (e.g. month names). |
|
|
Scrubs ISO local dates ( |
|
|
Scrubs ISO dates with UTC offset ( |
|
|
Scrubs ISO dates with optional offset. |
|
|
Scrubs ISO local times with optional fractional seconds. |
|
|
Scrubs ISO times with UTC offset. |
|
|
Scrubs ISO times with optional offset. |
|
|
Scrubs ISO local date-times. |
|
|
Scrubs ISO date-times with UTC offset. |
|
|
Scrubs ISO date-times with offset and time zone ID. |
|
|
Scrubs ISO date-times with optional offset and time zone. Matches all of the above date-time variants. |
|
|
Scrubs ISO instants (UTC timestamps). |
|
|
Scrubs ISO ordinal dates (day of year). |
|
|
Scrubs ISO week dates. |
|
|
Scrubs basic ISO dates without separators. |
|
|
Scrubs RFC 1123 date-times (HTTP headers). Always uses |
|
Field Scrubbers
| Factory Method | Description |
|---|---|
|
Replaces the value of a named field with |
Extension Scrubbers
The following scrubbers are provided by extension modules. See Extensions — Format-Specific Printing and Scrubbing for details and dependency coordinates.
| Factory Method | Description |
|---|---|
|
Scrubs a JSON node identified by a JSON Pointer path (e.g. |
|
Scrubs the value of an HTTP header by name. |
|
Scrubs the |
|
Scrubs the |
Replacements — Control What Scrubbed Values Become
By default, built-in scrubbers replace each match with a numbered placeholder like [uuid 1], [datetime 1].
If the same value appears more than once, it gets the same number, so you can still see that two scrubbed values were equal.
You can change this behavior by calling the replacement method on a scrubber to choose a different Replacement function.
var blogPost =
    createBlogPost("Latest News", "Lorem ipsum dolor sit amet, consectetur adipiscing elit.");

approve(blogPost)
    .printedAs(multiLineString())
    .scrubbedOf(uuids().replacement(labeled("id"))) (1)
    .scrubbedOf(dateTimeFormat("yyyy-MM-dd'T'HH:mm:ss.SSSX").replacement(masking())) (2)
.byFile();val blogPost =
createBlogPost("Latest News", "Lorem ipsum dolor sit amet, consectetur adipiscing elit.")
approve(blogPost)
.printedAs(multiLineString())
.scrubbedOf(uuids().replacement(labeled("id"))) (1)
.scrubbedOf(dateTimeFormat("yyyy-MM-dd'T'HH:mm:ss.SSSX").replacement(masking())) (2)
.byFile()| 1 | replaces the UUID with a fixed label [id] instead of the default [uuid 1] |
| 2 | masks the date-time, replacing each digit with 1 and each letter with a or A |
BlogPost [
  id=[id],
  title=Latest News,
  content=Lorem ipsum dolor sit amet, consectetur adipiscing elit.,
  published=1111-11-11A11:11:11.111111A
]
The following replacement functions are available via the Replacements utility class:
| Factory Method | Description | Example Output |
|---|---|---|
|
Replaces with |
|
|
Same as |
|
|
Replaces every match with the same fixed label |
|
|
Replaces every match with the given static string. |
|
|
Replaces date matches with a human-readable relative duration. Only available on date/time scrubbers. |
|
|
Replaces date-time matches with a human-readable relative duration including time. Only available on date/time scrubbers. |
|
|
Masks each character: uppercase letters become |
|
You can also implement a custom Replacement<String> as a lambda.
It receives the matched string and a count (the number of the distinct match) and returns the replacement.
Build Your Own Scrubber
The RegexScrubber already allows for a lot of special custom cases.
In case this isn’t enough, you can also provide a custom Scrubber<T>/UnaryOperator<T> implementation to the builder’s scrubbedOf method.
Contact contact = createContact("Jane Doe", "jane@approvej.org", "+1 123 456 7890");
approve(contact)
    .scrubbedOf(it -> new Contact(-1, it.name(), it.email(), it.phoneNumber())) (1)
    .printedAs(multiLineString())
.byFile();val contact = createContact("Jane Doe", "jane@approvej.org", "+1 123 456 7890")
approve(contact)
.scrubbedOf { Contact(-1, it.name, it.email, it.phoneNumber) } (1)
.printedAs(multiLineString())
.byFile()| 1 | this custom Scrubber specifically replaces the number property of the Contact with a constant |
Contact [
  number=-1,
  name=Jane Doe,
  email=jane@approvej.org,
  phoneNumber=+1 123 456 7890
]
Note that this Scrubber is a Scrubber<Contact> and not a Scrubber<String>.
Hence, it is necessary to apply it before the Printer is applied.
If you want to reuse a scrubber across tests, you can implement the Scrubber interface as a standalone class.
See Custom Scrubber for a full walkthrough.
Approving — Adjust the Verification
You conclude the ApprovalBuilder by specifying by which Approver the received value should be approved.
Approve Inline Without Files
The ApprovalBuilder.byValue() method will use an InplaceApprover to approve the received value by comparison with a directly provided previously approved value.
That way, the approved value is plainly visible in the test code.
However, this might not be practical for large objects.
It also does not allow to use a diff tool to compare the result with the previously approved value.
Person person = createPerson("John Doe", LocalDate.of(1990, 1, 1));

approve(person).byValue("Person[name=John Doe, birthDate=1990-01-01]");val person = createPerson("John Doe", LocalDate.of(1990, 1, 1))
approve(person).byValue("Person[name=John Doe, birthDate=1990-01-01]")Approve by File
The ApprovalBuilder.byFile() method will use a FileApprover to approve the received value by comparison with a previously approved value stored in a file.
It is used in most of the examples above.
If no approved file exists, it will be created as an empty approved file. The received value will be written to another received file.
If there are approved files with the correct base name, but a different filename extension, these will be automatically deleted. The most recently modified one is renamed with the correct filename extension, if no file of that name exists yet.
If the approved file exists, it will be compared with the received value. If they are equal, the test will pass. Any existing received file will be deleted automatically in that case.
If the files are not equal, the test will fail. The received value will be persisted in a received file. Any existing received value will be overwritten by this.
You can use a diff tool of your choice to compare the two files and merge values that you want to approve.
Next to Test
By default, the FileApprover will put the received and approved files next to the test class and name them like the test case method.
For nested or inner test classes (e.g. JUnit 5 @Nested), the class name includes enclosing class names separated by dots (e.g. OuterTest.InnerTest).
You can make this explicit by using the PathProviderBuilder.nextToTest() method.
Person person = createPerson("John Doe", LocalDate.of(1990, 1, 1));

approve(person).byFile(nextToTest()); (1)val person = createPerson("John Doe", LocalDate.of(1990, 1, 1))
approve(person).byFile(nextToTest()) (1)| 1 | defines the PathProvider explicitly, same as just calling byFile() |
.
└── 📁src/test/java/…
    ├── 📄 <TestClass>.java
    ├── 📄 <TestClass>-<testMethod>-approved.txt
    └── 📄 <TestClass>-<testMethod>-received.txt
Custom Filename Extension
The PathProviderBuilder.filenameExtension method gives you the opportunity to use a different file extension for the approved and received files.
Most of the time you probably want to do this because you’re using a special printer that creates a specific format (e.g. JSON, XML, YAML, …).
In that case, you might want to provide a Implement a Reusable PrintFormat and override the filenameExtension method of the Printer instead of changing the filename extension here.
|
Person person = createPerson("John Doe", LocalDate.of(1990, 1, 1));

approve(person)
    .printedBy(
        it ->
            """
            person:
              name: "%s"
              birthDate: "%s"
            """
                .formatted(it.name(), it.birthDate())) (1)
.byFile(nextToTest().filenameExtension("yml"));val person = createPerson("John Doe", LocalDate.of(1990, 1, 1))
approve(person)
.printedBy {
"""
person:
name: "${it.name}"
birthDate: "${it.birthDate}"
"""
.trimIndent()
} (1)
.byFile(nextToTest().filenameExtension("yml")) (2)| 1 | this printer will create a YAML version of the object |
| 2 | so it makes sense to change the filename extension, so your IDE will apply appropriate syntax highlighting |
.
└── 📁src/test/java/…
    ├── 📄 <TestClass>.java
    ├── 📄 <TestClass>-<testMethod>-approved.<filenameExtension>
    └── 📄 <TestClass>-<testMethod>-received.<filenameExtension>
In a Subdirectory
If you have test classes with a lot of approval tests, there are quite a lot of files created next to the test class.
In that case, you can use the PathProviderBuilder.nextToTestInSubdirectory to put all the files in a subdirectory named after the test class.
Person person = createPerson("John Doe", LocalDate.of(1990, 1, 1));

approve(person).printedAs(new PersonYamlPrintFormat()).byFile(nextToTestInSubdirectory());val person = createPerson("John Doe", LocalDate.of(1990, 1, 1))
approve(person).printedAs(PersonYamlPrinter()).byFile(nextToTestInSubdirectory()).
└── 📁src/test/java/…
├── 📁 <TestClass>
│ ├── 📄 <testMethod>-approved.txt
│ └── 📄 <testMethod>-received.txt
└── 📄 <TestClass>.java
Given Path
Alternatively, you can simply specify the path of the approved file.
If the given approved file path contains the word approved just before the filename extension, it will be replaced with received to determine the received file path.
Otherwise, the word received will be added at the end of the filename.
For example
-
src/test/resources/ApprovingDocTest-approve_file_approved_path-approved.yaml→src/test/resources/ApprovingDocTest-approve_file_approved_path-received.yaml -
src/test/resources/ApprovingDocTest-approve_file_approved_path.yaml→src/test/resources/ApprovingDocTest-approve_file_approved_path-received.yaml.
Person person = createPerson("John Doe", LocalDate.of(1990, 1, 1));

approve(person)
    .printedAs(new PersonYamlPrintFormat())
.byFile("src/test/resources/BasicExamples-approve file approved path.yaml"); (1)val person = createPerson("John Doe", LocalDate.of(1990, 1, 1))
approve(person)
.printedAs(PersonYamlPrinter())
.byFile("src/test/resources/BasicExamples-approve file approved path.yaml") (1)| 1 | this will expect the approved file at this path, the received file will be created next to it at src/test/resources/ApprovingDocTest-approve_file_approved_path-received.yaml |
.
└── 📁src/test/java/…
│   └── 📄 <TestClass>.java
└── 📁src/test/resources
    ├── 📄 src/test/resources/BasicExamples-approve_file_approved_path.yaml
    └── 📄 src/test/resources/BasicExamples-approve_file_approved_path-received.yaml
Custom PathProvider/PathProviderBuilder
You can also define your own PathProvider and pass it to the byFile method.
Or you can create a method that returns a PathProviderBuilder and pass it to the byFile method.
That way the filename extension of the used Printer is set just before approval.
In that case, you might want to take advantage of the StackTraceTestFinderUtil class to find the test source path or the current test method based on the current stack trace.
Catch Forgotten Approvals
If you call approve() without a concluding terminal method (by(), byFile(), or byValue()), the test will silently pass without any approval actually happening.
To catch this mistake, you can annotate your test class with @ApprovalTest.
@org.approvej.ApprovalTest
class MyTest {
  // ...
}@org.approvej.ApprovalTest
class MyTest {
// ...
}This registers a JUnit Jupiter extension that checks after each test method whether all approve() calls were concluded.
If any were not, the test fails with a DanglingApprovalError.
The extension is safe to use with parallel test execution.
Reviewing — Check Differences
If the received value differs from the previously approved, ApproveJ will by default simply fail the test. You then need to review the differences and decide if these are to be approved or actually were not intended.
Without a reviewer, you would have to locate the received and approved files yourself, open them side by side, and merge the changes manually. A configured reviewer automates this: it opens your diff tool of choice directly on the right files, giving you a faster feedback loop and letting you approve changes without leaving the test run.
Blocking/Non-Blocking Review
Some reviewers are blocking. They trigger the diff/merge tool and wait for you to close it again. This gives you the opportunity to merge the content of the two files before the test finishes, so the test does not fail due to your given approval.
Other implementations are non-blocking. These simply display the differences between the two files, but will fail the test immediately. So, after you merged the files or fixed the code, you need to run the test again.
Configure a Reviewer Script
The most common way to set up reviewing is to configure a review script in your approvej.properties.
Since each developer on a team may prefer a different diff tool, the best place for this is the user-level configuration file:
~/.config/approvej/approvej.propertiesdefaultFileReviewerScript = idea diff --wait "{receivedFile}" "{approvedFile}"The script can contain the following placeholders:
-
{receivedFile}— will be replaced with the path to the received file -
{approvedFile}— will be replaced with the path to the approved file
Use --wait or similar flags if your diff tool supports them to make the review blocking.
This allows you to approve changes before the test finishes.
|
Here are configuration examples for common diff tools:
defaultFileReviewerScript = idea diff --wait "{receivedFile}" "{approvedFile}"| The ApproveJ IntelliJ plugin lets you view diffs and approve received files directly in the IDE — handy when you want to review changes without re-running the test to trigger the reviewer script. |
defaultFileReviewerScript = code --wait --diff "{receivedFile}" "{approvedFile}"defaultFileReviewerScript = bcomp -wait "{receivedFile}" "{approvedFile}"defaultFileReviewerScript = meld "{receivedFile}" "{approvedFile}"defaultFileReviewerScript = vimdiff "{receivedFile}" "{approvedFile}"You can also set this per project in src/test/resources/approvej.properties or via an environment variable (see Configuration — Global Defaults and Environment Settings).
Override the Reviewer for a Single Test
In rare cases you may want to use a different reviewer for a specific test.
You can do so by calling the reviewedBy method on the ApprovalBuilder.
Person person = createPerson("John Doe", LocalDate.of(1990, 1, 1));

approve(person)
    .printedAs(new PersonYamlPrintFormat())
    .reviewedBy("idea diff {receivedFile} {approvedFile}") (1)
.byFile(); (2)val person = createPerson("John Doe", LocalDate.of(1990, 1, 1))
approve(person)
.printedAs(PersonYamlPrinter())
.reviewedBy("meld \"{receivedFile}\" \"{approvedFile}\"") (1)
.byFile() (2)| 1 | sets the given script to be executed to support the review |
| 2 | executes the review script if the received value differs from the approved value |
Automatic Review
If you have a lot of approvals that need to be updated, you might want to just accept all the updates automatically.
In that case, you can use the automatic FileReviewer.
It simply writes the received value into the approved file without checking them at all.
| This will overwrite your approved file(s). You will probably want to check the changed files before committing them to version control! |
Person person = createPerson("John Doe", LocalDate.of(1990, 1, 1));

approve(person)
    .printedAs(new PersonYamlPrintFormat())
    .reviewedBy(Reviewers.automatic())
.byFile();val person = createPerson("John Doe", LocalDate.of(1990, 1, 1))
approve(person).printedAs(PersonYamlPrinter()).reviewedBy(Reviewers.automatic()).byFile()You can also set this globally via configuration:
defaultFileReviewer = automaticExtensions — Format-Specific Printing and Scrubbing
ApproveJ’s core module has no external dependencies. For integration with popular libraries, ApproveJ provides optional extension modules that add format-specific printing, scrubbing, and more.
JSON with Jackson
ApproveJ provides JSON support via Jackson in two modules:
-
json-jacksonfor Jackson 2.x -
json-jackson3for Jackson 3.x
Both modules provide the same functionality with identical APIs. Choose the one matching your project’s Jackson version.
Use only one of these modules in your project, not both.
Both modules register with the same alias "json", and having both on the classpath will cause an error at runtime.
|
Since Jackson is a provided dependency, you need to add it explicitly.
Dependencies
Jackson 2.x
implementation 'org.approvej:json-jackson:1.5.1'
implementation 'com.fasterxml.jackson.core:jackson-databind:2.18.0'
implementation 'com.fasterxml.jackson.datatype:jackson-datatype-jsr310:2.18.0'implementation("org.approvej:json-jackson:1.5.1")
implementation("com.fasterxml.jackson.core:jackson-databind:2.18.0")
implementation("com.fasterxml.jackson.datatype:jackson-datatype-jsr310:2.18.0")<dependency>
<groupId>org.approvej</groupId>
<artifactId>json-jackson</artifactId>
<version>1.5.1</version>
</dependency>
<dependency>
<groupId>com.fasterxml.jackson.core</groupId>
<artifactId>jackson-databind</artifactId>
<version>2.18.0</version>
</dependency>
<dependency>
<groupId>com.fasterxml.jackson.datatype</groupId>
<artifactId>jackson-datatype-jsr310</artifactId>
<version>2.18.0</version>
</dependency>Jackson 3.x
implementation 'org.approvej:json-jackson3:1.5.1'
implementation 'tools.jackson.core:jackson-databind:3.0.0'implementation("org.approvej:json-jackson3:1.5.1")
implementation("tools.jackson.core:jackson-databind:3.0.0")<dependency>
<groupId>org.approvej</groupId>
<artifactId>json-jackson3</artifactId>
<version>1.5.1</version>
</dependency>
<dependency>
<groupId>tools.jackson.core</groupId>
<artifactId>jackson-databind</artifactId>
<version>3.0.0</version>
</dependency>| If you use the ApproveJ BOM, you can omit the Jackson version numbers as the BOM provides recommended versions. |
Jackson 3 has Java date/time support built-in, so no separate jackson-datatype-jsr310 dependency is needed.
|
The JSON module provides a JsonPrintFormat (see Printing — Customize How Values Are Turned into Strings) and a JsonPointerScrubber (see Scrubbing — Make Random Parts Static) for working with JSON data in the approval flow.
Import Differences
The API is identical between both modules. Only the import statements differ:
| Jackson 2.x | Jackson 3.x |
|---|---|
|
|
|
|
Print as JSON
The JsonPrintFormat serializes any object as pretty-printed JSON using Jackson.
This is the most common way to use the JSON module — pass any POJO, record, or collection and get a readable, diffable JSON representation.
To use JSON as the default print format for all approvals, configure it globally:
defaultPrintFormat = jsonAlternatively, apply it to a single approval via printedAs:
Person person = createPerson("John Doe", LocalDate.of(1990, 1, 1));

approve(person)
    .printedAs(json()) (1)
.byFile();val person = createPerson("John Doe", LocalDate.of(1990, 1, 1))
approve(person)
.printedAs(json()) (1)
.byFile()| 1 | applies the JsonPrintFormat to serialize the Person object as JSON |
{
  "name" : "John Doe",
  "birthDate" : "1990-01-01"
}
Pretty Print a JSON String
If you already have a JSON string (e.g. from an API response), JsonPrintFormat automatically pretty prints it.
The only downside is that you cannot use JSON-specific scrubbers like JsonPointerScrubber.
String createdBlogPostJson =
    createTaggedBlogPost(
        "Latest News",
        "Lorem ipsum dolor sit amet, consectetur adipiscing elit.",
        List.of(NEWS, ENTERTAINMENT));

approve(createdBlogPostJson)
    .scrubbedOf(uuids())
    .scrubbedOf(dateTimeFormat("yyyy-MM-dd'T'HH:mm:ss.SSSX"))
    .printedAs(json()) (1)
.byFile();val createdBlogPostJson =
createTaggedBlogPost(
"Latest News",
"Lorem ipsum dolor sit amet, consectetur adipiscing elit.",
listOf(NEWS, ENTERTAINMENT),
)
approve(createdBlogPostJson)
.scrubbedOf(uuids())
.scrubbedOf(dateTimeFormat("yyyy-MM-dd'T'HH:mm:ss.SSSX"))
.printedAs(json()) (1)
.byFile()| 1 | applies the JsonPrintFormat to pretty print the given JSON string |
{
  "id" : "[uuid 1]",
  "title" : "Latest News",
  "content" : "Lorem ipsum dolor sit amet, consectetur adipiscing elit.",
  "tagIds" : [ "[uuid 2]", "[uuid 3]" ],
  "published" : "[datetime 1]"
}
Scrub Specific JSON Fields
The JsonPointerScrubber can be used to scrub a JSON node identified by a JsonPointer.
Compared to generic Scrubber<String> implementations this is particularly useful when there are several values matching the same pattern, but only one of them needs to be scrubbed.
For instance, if you have a JSON containing two UUIDs, one that was generated by the code (and hence needs to be scrubbed) and one that is a reference to another resource and should not be scrubbed.
To use the JsonPointerScrubber, first parse the JSON string into a JsonNode, then apply the scrubber.
Combine it with printedAs(json()) to get a readable pretty-printed result.
String createdBlogPostJson =
    createTaggedBlogPost(
        "Latest News",
        "Lorem ipsum dolor sit amet, consectetur adipiscing elit.",
        List.of(NEWS, ENTERTAINMENT));

approve(jsonMapper.readTree(createdBlogPostJson))
    .scrubbedOf(jsonPointer("/id").replacement("[scrubbed id]"))
    .scrubbedOf(jsonPointer("/published").replacement("[scrubbed published]"))
    .printedAs(json()) (1)
.byFile();val createdBlogPostJson =
createTaggedBlogPost(
"Latest News",
"Lorem ipsum dolor sit amet, consectetur adipiscing elit.",
listOf(NEWS, ENTERTAINMENT),
)
approve(jsonMapper.readTree(createdBlogPostJson))
.scrubbedOf(jsonPointer("/id").replacement("[scrubbed id]"))
.scrubbedOf(jsonPointer("/published").replacement("[scrubbed published]"))
.printedAs(json()) (1)
.byFile()| 1 | applies the JsonPrintFormat for a readable approved file |
{
  "id" : "[scrubbed id]",
  "title" : "Latest News",
  "content" : "Lorem ipsum dolor sit amet, consectetur adipiscing elit.",
  "tagIds" : [ "00000000-0000-0000-0000-000000000001", "00000000-0000-0000-0000-000000000002" ],
  "published" : "[scrubbed published]"
}
YAML with Jackson
ApproveJ provides YAML support via Jackson in two modules:
-
yaml-jacksonfor Jackson 2.x -
yaml-jackson3for Jackson 3.x
Both modules provide the same functionality with identical APIs. Choose the one matching your project’s Jackson version.
Use only one of these modules in your project, not both.
Both modules register with the same alias "yaml", and having both on the classpath will cause an error at runtime.
|
Since Jackson is a provided dependency, you need to add it explicitly.
Dependencies
Jackson 2.x
implementation 'org.approvej:yaml-jackson:1.5.1'
implementation 'com.fasterxml.jackson.core:jackson-databind:2.18.0'
implementation 'com.fasterxml.jackson.dataformat:jackson-dataformat-yaml:2.18.0'
implementation 'com.fasterxml.jackson.datatype:jackson-datatype-jsr310:2.18.0'implementation("org.approvej:yaml-jackson:1.5.1")
implementation("com.fasterxml.jackson.core:jackson-databind:2.18.0")
implementation("com.fasterxml.jackson.dataformat:jackson-dataformat-yaml:2.18.0")
implementation("com.fasterxml.jackson.datatype:jackson-datatype-jsr310:2.18.0")<dependency>
<groupId>org.approvej</groupId>
<artifactId>yaml-jackson</artifactId>
<version>1.5.1</version>
</dependency>
<dependency>
<groupId>com.fasterxml.jackson.core</groupId>
<artifactId>jackson-databind</artifactId>
<version>2.18.0</version>
</dependency>
<dependency>
<groupId>com.fasterxml.jackson.dataformat</groupId>
<artifactId>jackson-dataformat-yaml</artifactId>
<version>2.18.0</version>
</dependency>
<dependency>
<groupId>com.fasterxml.jackson.datatype</groupId>
<artifactId>jackson-datatype-jsr310</artifactId>
<version>2.18.0</version>
</dependency>Jackson 3.x
implementation 'org.approvej:yaml-jackson3:1.5.1'
implementation 'tools.jackson.core:jackson-databind:3.0.0'
implementation 'tools.jackson.dataformat:jackson-dataformat-yaml:3.0.0'implementation("org.approvej:yaml-jackson3:1.5.1")
implementation("tools.jackson.core:jackson-databind:3.0.0")
implementation("tools.jackson.dataformat:jackson-dataformat-yaml:3.0.0")<dependency>
<groupId>org.approvej</groupId>
<artifactId>yaml-jackson3</artifactId>
<version>1.5.1</version>
</dependency>
<dependency>
<groupId>tools.jackson.core</groupId>
<artifactId>jackson-databind</artifactId>
<version>3.0.0</version>
</dependency>
<dependency>
<groupId>tools.jackson.dataformat</groupId>
<artifactId>jackson-dataformat-yaml</artifactId>
<version>3.0.0</version>
</dependency>| If you use the ApproveJ BOM, you can omit the Jackson version numbers as the BOM provides recommended versions. |
Jackson 3 has Java date/time support built-in, so no separate jackson-datatype-jsr310 dependency is needed.
|
The YAML module provides a YamlPrintFormat (see Printing — Customize How Values Are Turned into Strings) for rendering objects as YAML in the approval flow.
Import Differences
The API is identical between both modules. Only the import statements differ:
| Jackson 2.x | Jackson 3.x |
|---|---|
|
|
|
|
Print as YAML
The YamlPrintFormat allows you to print any object in YAML format.
To use YAML as the default print format for all approvals, configure it globally:
defaultPrintFormat = yamlAlternatively, apply it to a single approval via printedAs:
Person person = createPerson("John Doe", LocalDate.of(1990, 1, 1));

approve(person)
    .printedAs(yaml()) (1)
.byFile();val person = createPerson("John Doe", LocalDate.of(1990, 1, 1))
approve(person)
.printedAs(yaml()) (1)
.byFile()| 1 | applies the YamlPrintFormat to convert the Person object to a string |
Creates the following approved file:
---
name: "John Doe"
birthDate: "1990-01-01"
HTTP — Catch Changes to Outgoing Requests
When your application calls an external HTTP API, a code change can silently alter the requests you send — a different path, a missing header, a changed body format. These issues often go unnoticed until they break in production. The HTTP extension lets you approve the exact HTTP requests your code sends. If a request changes, the approval test fails and shows you exactly what changed.

Dependencies
There are two ways to capture outgoing HTTP requests. Choose the one that fits your test setup.
HttpStubServer
A lightweight stub server included in the http module, with no additional dependencies.
implementation 'org.approvej:http:1.5.1'implementation("org.approvej:http:1.5.1")<dependency>
<groupId>org.approvej</groupId>
<artifactId>http</artifactId>
<version>1.5.1</version>
</dependency>WireMock Adapter
If you already use WireMock in your tests, the http-wiremock module provides a utility to convert WireMock requests for approval.
implementation 'org.approvej:http-wiremock:1.5.1'
implementation 'org.wiremock:wiremock:3.10.0'implementation("org.approvej:http-wiremock:1.5.1")
implementation("org.wiremock:wiremock:3.10.0")<dependency>
<groupId>org.approvej</groupId>
<artifactId>http</artifactId>
<version>1.5.1</version>
</dependency>
<dependency>
<groupId>org.approvej</groupId>
<artifactId>http-wiremock</artifactId>
<version>1.5.1</version>
</dependency>
<dependency>
<groupId>org.wiremock</groupId>
<artifactId>wiremock</artifactId>
<version>3.10.0</version>
</dependency>Approve Outgoing Requests
To approve the HTTP requests your code sends, you need to intercept them. Point your component at a stub server instead of the real API, then retrieve and approve the captured requests.
Using HttpStubServer
The HttpStubServer is a simple HTTP server based on the JVM’s built-in HttpServer.
It automatically records all received requests and replies with a configurable response.
With plain JDBC or unit tests, initialize the server and configure your component to use its address:
@AutoClose
private static final HttpStubServer cheeeperStub =
    new HttpStubServer().nextResponse(response().body("2999").statusCode(200));

@AutoClose
private static final HttpStubServer prycyStub =
new HttpStubServer().nextResponse(response().body("3199").statusCode(200));@AutoClose
private val cheeeperStub =
HttpStubServer().nextResponse(response().body("2999").statusCode(200))
@AutoClose
private val prycyStub = HttpStubServer().nextResponse(response().body("3199").statusCode(200))Then call your component and approve the captured requests:
PriceComparator priceComparator =
    new PriceComparator(
        new CheeeperVendor(cheeeperStub.address()),
        new PrycyVendor(prycyStub.address(), "secret token"));

List<LookupResult> lookupResults = priceComparator.lookupPrice("1234567890123");

assertThat(lookupResults).hasSize(2);

approve(cheeeperStub.lastReceivedRequest())
    .named("cheeper")
    .scrubbedOf(hostHeaderValue())
    .scrubbedOf(headerValue("User-agent"))
    .printedAs(httpRequest())
    .byFile();
approve(prycyStub.lastReceivedRequest())
    .named("prycy")
    .scrubbedOf(hostHeaderValue())
    .scrubbedOf(headerValue("User-agent"))
    .printedAs(httpRequest())
.byFile();val priceComparator =
PriceComparator(
CheeeperVendor(cheeeperStub.address()),
PrycyVendor(prycyStub.address(), "secret token"),
)
val lookupResults = priceComparator.lookupPrice("1234567890123")
assertThat(lookupResults).hasSize(2)
approve(cheeeperStub.lastReceivedRequest())
.named("cheeeper")
.scrubbedOf(hostHeaderValue())
.scrubbedOf(userAgentHeaderValue())
.printedAs(httpRequest())
.byFile()
approve(prycyStub.lastReceivedRequest())
.named("prycy")
.scrubbedOf(hostHeaderValue())
.scrubbedOf(userAgentHeaderValue())
.printedAs(httpRequest())
.byFile()
Call resetReceivedRequests() before exercising the code under test to ensure you only capture the requests you care about.
|
Wiring the HttpStubServer in Spring Boot
In a Spring Boot test, the HttpStubServer needs to be wired into the application context so your services use it instead of the real API.
The following example from the Spring Boot example project shows a complete test class that approves the HTTP requests sent by a payment service:
@SpringBootTest
class PaymentApprovalTest {

  @ServiceConnection
  static final PostgreSQLContainer postgres =
      new PostgreSQLContainer("postgres:17").waitingFor(forListeningPort());

  @AutoClose static final HttpStubServer paymentServer = new HttpStubServer(); (1)

  @DynamicPropertySource
  static void configurePayment(DynamicPropertyRegistry registry) { (2)
    registry.add("payment.gateway.url", paymentServer::address);
    registry.add("payment.gateway.token", () -> "test-token-123");
  }

  @Autowired private OrderService orderService;
  @Autowired private ProductRepository productRepository;

  @BeforeEach
  void resetPaymentStub() {
    paymentServer.resetReceivedRequests();
    paymentServer.nextResponse(
        response()
            .header("Content-Type", "application/json")
            .body(
                "{\"paymentId\":\"pay-abc-123\",\"status\":\"succeeded\","
                    + "\"processedAt\":\"2026-03-11T10:00:00Z\"}")
            .statusCode(200));
  }

  @Test
  void place_order_payment_request() {
    Product product =
        productRepository.save(
            new Product(
                "Espresso Machine",
                "Professional espresso machine",
                new BigDecimal("299.99"),
                "ESP-200"));

    orderService.placeOrder("Eve", "eve@example.com", List.of(product.getId()));

    approve(paymentServer.lastReceivedRequest()) (3)
        .scrubbedOf(hostHeaderValue())
        .printedAs(httpRequest())
        .scrubbedOf(uuids())
        .byFile();
  }

}| 1 | Create a static HttpStubServer.
@AutoClose shuts it down after all tests in the class. |
| 2 | @DynamicPropertySource injects the stub server’s address into the Spring property that your component reads (e.g., payment.gateway.url). |
| 3 | Call your service, then approve the captured HTTP request. |
Set the Content-Type header on stubbed responses if your code parses them — Spring’s RestClient and WebClient reject responses without a recognized content type.
|
The first run creates a -received.http file next to the test.
Review it, rename it to -approved.http, and re-run — the test passes.
|
Using WireMock
Use WireMockRequests.toReceivedHttpRequest() to convert WireMock’s Request objects to ReceivedHttpRequest:
import static org.approvej.http.wiremock.WireMockRequests.toReceivedHttpRequest;
import static org.approvej.http.ReceivedHttpRequestPrintFormat.httpRequest;
import static org.approvej.ApprovalBuilder.approve;

// Get the request from WireMock
Request request = wireMockServer.getAllServeEvents().getFirst().getRequest();

// Convert and approve
approve(toReceivedHttpRequest(request))
    .scrubbedOf(hostHeaderValue())
    .printedAs(httpRequest())
    .byFile();
To approve multiple requests:
wireMockServer.getAllServeEvents().stream()
    .map(event -> toReceivedHttpRequest(event.getRequest()))
    .forEach(request -> approve(request).named(request.uri().getPath()).byFile());
WireMock’s getAllServeEvents() returns events in reverse chronological order (most recent first).
If you need chronological order, reverse the list.
|
Print as HTTP Request Files
The ReceivedHttpRequestPrintFormat prints captured requests in the HTTP request file format.
This format is human-readable and supported by many IDEs, which can even execute the requests directly from the approved file.
Files are saved with the .http extension.
GET /api/prices?id=1234567890123
Connection: Upgrade, HTTP2-Settings
Host: {{Host}}
Http2-settings: AAEAAEAAAAIAAAAAAAMAAAAAAAQBAAAAAAUAAEAAAAYABgAA
Upgrade: h2c
User-agent: {{User-agent}}
POST /api/price-requests/
Authorization: Bearer secret token
Connection: Upgrade, HTTP2-Settings
Content-length: 24
Host: {{Host}}
Http2-settings: AAEAAEAAAAIAAAAAAAMAAAAAAAQBAAAAAAUAAEAAAAYABgAA
Upgrade: h2c
User-agent: {{User-agent}}
{"gtin":"1234567890123"}HTTP Scrubbers
Some HTTP headers contain values that change between test runs — the host varies by port, and the user-agent varies by JVM version.
The HttpScrubbers utility provides scrubbers for these common cases:
-
hostHeaderValue()– Scrubs theHostheader (varies by port) -
userAgentHeaderValue()– Scrubs theUser-agentheader (varies by JVM version) -
headerValue(name)– Scrubs any header by name
Database JDBC — Catch Changes to Queries and Data
The database extension provides two complementary approaches to approval testing with databases:
-
Approve the SQL your code sends — catch unintended changes to queries, just like the HTTP extension catches changes to HTTP requests. No test database setup required.
-
Approve the query results — verify the actual state in the database after your code runs.
| Approve SQL | Approve query results |
|---|---|
Catches changes in what your code sends |
Catches changes in what ends up in the database |
No test data or database state needed |
Requires a database with predictable state |
Uses |
Uses |
Dependencies
The database-jdbc module has no external dependencies beyond the JDK’s javax.sql API.
You need to provide a JDBC driver for your database (e.g., H2 for in-memory testing, or the driver for your production database).
implementation 'org.approvej:database-jdbc:1.5.1'implementation("org.approvej:database-jdbc:1.5.1")<dependency>
<groupId>org.approvej</groupId>
<artifactId>database-jdbc</artifactId>
<version>1.5.1</version>
</dependency>Approve SQL
When your application talks to a database, a code change can silently alter the SQL it sends — a different WHERE clause, a missing JOIN, a changed column list.
The RecordingDataSource intercepts and records all SQL statements your code executes, so you can approve them.

Wrap your application’s DataSource with a RecordingDataSource, then pass it to your code.
After execution, approve the recorded queries:
RecordingDataSource recordingDataSource = new RecordingDataSource(dataSource);

// ... pass recordingDataSource to your code instead of the real DataSource ...
try (Connection connection = recordingDataSource.getConnection();
    Statement statement = connection.createStatement()) {
  statement.executeQuery("SELECT id, name, email FROM users WHERE id = 1");
}

approve(recordingDataSource.lastRecordedQuery()).printedAs(sql()).byFile();val recordingDataSource = RecordingDataSource(dataSource)
// ... pass recordingDataSource to your code instead of the real DataSource ...
recordingDataSource.connection.use { connection ->
connection.createStatement().use { statement ->
statement.executeQuery("SELECT id, name, email FROM users WHERE id = 1")
}
}
approve(recordingDataSource.lastRecordedQuery()).printedAs(sql()).byFile()For PreparedStatement s, the SQL template with ? placeholders is recorded each time the statement is executed.
Wiring the RecordingDataSource in Spring Boot
Since RecordingDataSource implements DataSource, it can be passed anywhere a DataSource is expected.
With plain JDBC, simply wrap your DataSource before passing it to the code under test, as shown in the basic example above.
In a Spring Boot test, the DataSource is managed by the container and injected into your services automatically.
The following example from the Spring Boot example project shows a complete test class that wraps the DataSource with a RecordingDataSource and approves the recorded SQL:
@SpringBootTest
@Import(OrderSqlApprovalTest.RecordingDataSourceConfiguration.class) (1)
class OrderSqlApprovalTest {

  @ServiceConnection
  static final PostgreSQLContainer postgres =
      new PostgreSQLContainer("postgres:17").waitingFor(forListeningPort());

  @AutoClose static final HttpStubServer paymentServer = new HttpStubServer();

  @DynamicPropertySource
  static void configurePayment(DynamicPropertyRegistry registry) {
    registry.add("payment.gateway.url", paymentServer::address);
    registry.add("payment.gateway.token", () -> "test-token-123");
  }

  @Autowired private OrderService orderService;
  @Autowired private ProductRepository productRepository;
  @Autowired private DataSource dataSource; (2)

  @TestConfiguration
  static class RecordingDataSourceConfiguration {

    @Bean
    static BeanPostProcessor recordingDataSourceWrapper() { (3)
      return new BeanPostProcessor() {
        @Override
        public Object postProcessAfterInitialization(Object bean, String beanName) {
          if (bean instanceof DataSource dataSource && !(bean instanceof RecordingDataSource)) {
            return new RecordingDataSource(dataSource);
          }
          return bean;
        }
      };
    }
  }

  @BeforeEach
  void resetPaymentStub() {
    paymentServer.resetReceivedRequests();
    paymentServer.nextResponse(
        response()
            .header("Content-Type", "application/json")
            .body(
                "{\"paymentId\":\"pay-abc-123\",\"status\":\"succeeded\","
                    + "\"processedAt\":\"2026-03-11T10:00:00Z\"}")
            .statusCode(200));
  }

  @Test
  void place_order_sql() {
    Product product =
        productRepository.save(
            new Product("Tamper", "Precision tamper", new BigDecimal("34.99"), "TMP-100"));

    RecordingDataSource recordingDataSource = (RecordingDataSource) dataSource;
    recordingDataSource.resetRecordedQueries();

    orderService.placeOrder("Dave", "dave@example.com", List.of(product.getId()));

    approve(recordingDataSource.lastRecordedQuery()) (4)
        .printedAs(sql())
        .scrubbedOf(uuids())
        .byFile();
  }
}| 1 | @Import activates the @TestConfiguration.
Without it, the inner class is ignored. |
| 2 | The injected DataSource is now the RecordingDataSource wrapper. |
| 3 | A BeanPostProcessor intercepts the DataSource bean and wraps it with RecordingDataSource.
This ensures all beans — including your services and JPA — use the recording wrapper transparently. |
| 4 | Approve the last recorded SQL query using the SQL print format. |
Call resetRecordedQueries() before exercising the code under test to ensure you only capture the SQL you care about.
|
The first run creates a -received.sql file next to the test.
Review it, rename it to -approved.sql, and re-run — the test passes.
|
Pretty-Print SQL
The SqlPrintFormat formats SQL with line breaks and indentation, making it easy to review in approved files.
Files are saved with the .sql extension.
A query like SELECT u.id, u.name FROM users u WHERE u.active = 1 ORDER BY u.name becomes:
SELECT
  u.id,
  u.name
FROM
  users u
WHERE
  u.active = 1
ORDER BY
  u.name
Approve Query Results
When you need to verify the actual data in the database — after a migration, an import, or a service call — you can snapshot the query results and approve them.

Test Isolation
Approving database state only works if the data is predictable. When multiple tests write to the same database, execution order or parallel runs can cause unexpected results.
Common strategies to keep tests isolated:
-
Separate database per test — Use a fresh in-memory database (e.g., H2 with a unique URL per test) so each test starts with a clean slate.
-
Transaction rollback — Run each test in a transaction and roll back after the assertion. Spring’s
@Transactionaltest support does this by default. -
Reset between tests — Truncate or re-seed tables in a
@BeforeEachmethod. -
Targeted queries — Use
WHEREclauses to query only the data created by the current test, so other rows don’t affect the result.
Regardless of which strategy you use, scrub any non-deterministic column values (auto-incremented IDs, timestamps) so the approved file stays stable.
Snapshot a Query
Use DatabaseSnapshot.query() to execute a SQL query and capture the result as a QueryResult.
It takes a standard javax.sql.DataSource — in a Spring Boot test, inject the one Spring already manages; with plain JDBC, create one directly (e.g., H2’s JdbcDataSource).
QueryResult result = query(dataSource, "SELECT * FROM users");val result = query(dataSource, "SELECT * FROM users")All cell values are converted to strings.
NULL database values are rendered as the string <null>.
If you already have a JDBC ResultSet (e.g., from your own JdbcClient or JdbcTemplate query), you can use QueryResult.of(resultSet) directly instead of going through DatabaseSnapshot.
Print as Markdown Table
The MarkdownTablePrintFormat prints query results as a Markdown-compatible ASCII table.
Files are saved with the .md extension.
approve(query(dataSource, "SELECT * FROM users"))
    .scrubbedOf(columnValue("id"))
    .printedAs(markdownTable())
.byFile();approve(query(dataSource, "SELECT * FROM users"))
.scrubbedOf(columnValue("id"))
.printedAs(markdownTable())
.byFile()Creates the following approved file:
| ID | NAME | EMAIL |
|------|-------|----------------|
| [id] | Alice | alice@test.com |
| [id] | Bob | bob@test.com |Database Scrubbers
Some columns contain values that change between test runs — auto-incremented IDs, timestamps, or generated tokens.
The DatabaseScrubbers utility provides a scrubber for these cases:
-
columnValue(name)— Scrubs all values in the named column (case-insensitive)
approve(query(dataSource, "SELECT * FROM users"))
  .scrubbedOf(columnValue("id"))
  .printedAs(markdownTable())
.byFile();approve(query(dataSource, "SELECT * FROM users"))
.scrubbedOf(columnValue("id"))
.printedAs(markdownTable())
.byFile()By default, a column named id is replaced with [id].
You can customize the replacement:
approve(query(dataSource, "SELECT * FROM users"))
    .scrubbedOf(columnValue("id").replacement("***"))
    .printedAs(markdownTable())
.byFile();approve(query(dataSource, "SELECT * FROM users"))
.scrubbedOf(columnValue("id").replacement("***"))
.printedAs(markdownTable())
.byFile()Image Approval
ApproveJ supports approval testing of images, which is particularly useful for visual regression testing. This is commonly used with browser automation tools like Playwright to capture screenshots and ensure UI consistency across changes.
Basic Image Approval
To approve an image, use the approveImage static method from ImageApprovalBuilder.
It accepts either a BufferedImage or a byte[] (for direct use with screenshot APIs) and provides a fluent API similar to text approval.
The byte[] overload works seamlessly with popular browser automation tools:
try (Playwright playwright = Playwright.create()) {
  Browser browser =
      playwright.chromium().launch(new BrowserType.LaunchOptions().setHeadless(true));
  Page page = browser.newPage();
  page.setViewportSize(1280, 720);

  page.navigate("https://approvej.org");

  approveImage(page.screenshot()) (1)
      .byFile(); (2)
}| 1 | Creates an ImageApprovalBuilder directly from the screenshot bytes |
| 2 | Compares result to a previously approved image file next to the test |
ChromeOptions options = new ChromeOptions();
options.addArguments("--headless");
WebDriver driver = new ChromeDriver(options);
try {
  driver.manage().window().setSize(new Dimension(1280, 720));
  driver.get("https://approvej.org");

  byte[] screenshot = ((TakesScreenshot) driver).getScreenshotAs(OutputType.BYTES); (1)

  approveImage(screenshot) (2)
      .byFile();
} finally {
  driver.quit();
}| 1 | Get screenshot as byte array using OutputType.BYTES |
| 2 | Pass bytes directly to approveImage |
This will create files named <TestClass>-<testMethod>-received.png and <TestClass>-<testMethod>-approved.png next to your test.
When the test runs for the first time, a blank approved file is created. Copy the received file to the approved file (or use a diff tool) to establish the baseline. Subsequent runs compare the new screenshot against this approved baseline.
Image Comparators
ApproveJ provides two image comparison strategies, each with different characteristics and use cases.
Perceptual Hash (Default)
Perceptual hashing (pHash) is the default comparison method. It is robust to minor visual differences that are imperceptible to humans.
try (Playwright playwright = Playwright.create()) {
  Browser browser =
      playwright.chromium().launch(new BrowserType.LaunchOptions().setHeadless(true));
  Page page = browser.newPage();
  page.setViewportSize(1280, 720);

  page.navigate("https://approvej.org");

  approveImage(page.screenshot())
      .comparedBy(perceptualHash()) (1)
      .byFile();
}| 1 | Explicitly use perceptual hash comparison (this is the default) |
How it works:
-
Both images are resized to 32×32 pixels
-
Converted to grayscale
-
A Discrete Cosine Transform (DCT) is applied
-
The low-frequency components are extracted
-
A 64-bit hash is generated based on whether each DCT value exceeds the mean
-
The hashes are compared using Hamming distance
Strengths:
-
Robust to antialiasing differences across browsers/platforms
-
Tolerant of minor font rendering variations
-
Handles slight color shifts from compression
-
Ignores subpixel rendering differences
-
Fast comparison (comparing two 64-bit numbers)
Weaknesses:
-
May miss small, localized changes (e.g., a single button color change)
-
Less precise for pixel-perfect requirements
-
Sensitive to significant layout shifts
Best for:
-
Cross-browser visual testing
-
CI/CD environments with different rendering engines
-
Testing on multiple operating systems
-
General UI regression testing
Pixel Comparison
Pixel-by-pixel comparison calculates the exact difference between each pixel.
try (Playwright playwright = Playwright.create()) {
  Browser browser =
      playwright.chromium().launch(new BrowserType.LaunchOptions().setHeadless(true));
  Page page = browser.newPage();
  page.setViewportSize(1280, 720);

  page.navigate("https://approvej.org");

  approveImage(page.screenshot())
      .comparedBy(pixel().withThreshold(1.0)) (1)
      .byFile();
}| 1 | Use pixel comparison with 1.0 threshold (exact match required) |
How it works:
-
Each pixel’s RGB values are compared
-
Differences are weighted by alpha (transparency)
-
Total difference is calculated as a percentage
Strengths:
-
Precise detection of any visual change
-
Good for pixel-perfect design requirements
-
Detects small, localized changes
Weaknesses:
-
Sensitive to antialiasing differences
-
Fails on subpixel rendering variations
-
Different browsers/platforms may produce slightly different results
-
Font rendering differences often cause false failures
Best for:
-
Same-browser, same-platform testing
-
Pixel-perfect design verification
-
Detecting subtle changes like icons or colors
Configuring Thresholds
Both comparators accept a threshold to control how much difference is acceptable.
try (Playwright playwright = Playwright.create()) {
  Browser browser =
      playwright.chromium().launch(new BrowserType.LaunchOptions().setHeadless(true));
  Page page = browser.newPage();
  page.setViewportSize(1280, 720);

  page.navigate("https://approvej.org");

  approveImage(page.screenshot())
      .comparedBy(perceptualHash().withThreshold(0.95)) (1)
      .byFile();
}| 1 | Require at least 95% similarity |
Perceptual Hash Threshold:
-
Default: 0.90 (90% similarity)
-
Range: 0.0 to 1.0
-
Higher values = stricter matching
-
Recommended: 0.85-0.95 for most use cases
Pixel Comparison Threshold:
-
Default: 1.0 (100% similarity / exact match)
-
Range: 0.0 to 1.0
-
Higher values = stricter matching
-
Recommended: 0.99-1.0 depending on stability needs
Common Challenges in Visual Testing
Visual approval testing can be tricky due to various sources of non-determinism. Here are common problems and solutions.
Animations and Transitions
CSS animations and transitions can cause screenshots to capture intermediate states, leading to flaky tests.
try (Playwright playwright = Playwright.create()) {
  Browser browser =
      playwright.chromium().launch(new BrowserType.LaunchOptions().setHeadless(true));
  Page page = browser.newPage();
  page.setViewportSize(1280, 720);

  page.navigate("https://approvej.org");

  // Wait for network to be idle (all resources loaded)
  page.waitForLoadState(); (1)

  // Disable CSS animations and transitions
  page.addStyleTag( (2)
      new Page.AddStyleTagOptions()
          .setContent(
              """
              *, *::before, *::after {
                animation-duration: 0s !important;
                animation-delay: 0s !important;
                transition-duration: 0s !important;
                transition-delay: 0s !important;
              }
              """));

  approveImage(page.screenshot()).byFile();
}| 1 | Wait for all resources to load |
| 2 | Inject CSS to disable all animations and transitions |
Dynamic Content
Content that changes between runs (timestamps, ads, user-specific data) will cause failures.
Solutions:
-
Mock or stub dynamic data sources
-
Screenshot specific elements instead of full pages
-
Use CSS to hide dynamic elements before capturing
-
Scrub dynamic content with
display: none
try (Playwright playwright = Playwright.create()) {
  Browser browser =
      playwright.chromium().launch(new BrowserType.LaunchOptions().setHeadless(true));
  Page page = browser.newPage();
  page.setViewportSize(1280, 720);

  page.navigate("https://approvej.org");
  page.waitForLoadState();

  // Screenshot only a specific element instead of full page
  approveImage(page.locator("h1").screenshot()) (1)
      .byFile();
}| 1 | Screenshot only the h1 element |
Font Rendering Differences
Different operating systems render fonts differently, causing pixel-level variations.
Solutions:
-
Use perceptual hash comparison (default) — it’s designed for this
-
Run tests in containerized environments with consistent fonts
-
Use web fonts that render consistently across platforms
-
Lower pixel comparison threshold if you must use pixel comparison
Viewport and Resolution
Different screen sizes and DPI settings affect rendering.
Solutions:
-
Always set explicit viewport size:
page.setViewportSize(1280, 720) -
Use consistent device scale factor
-
Document and enforce the expected resolution in CI
Network and Loading Timing
Images or external resources may not be fully loaded when the screenshot is taken.
Solutions:
-
Use
page.waitForLoadState()to wait for network idle -
Wait for specific elements:
page.waitForSelector(".hero-image") -
Add explicit waits for lazy-loaded content
-
Consider using
page.waitForTimeout()as a last resort (not recommended for production)
Scrolling and Lazy Loading
Content below the fold may not be rendered or may trigger lazy loading.
Solutions:
-
Scroll to the element before screenshotting
-
Use full-page screenshots:
page.screenshot(new Page.ScreenshotOptions().setFullPage(true)) -
Trigger lazy loading by scrolling, then scroll back
Cursor and Focus States
The cursor position or focused elements can vary between runs.
Solutions:
-
Click elsewhere before taking screenshot:
page.click("body") -
Move mouse to consistent position:
page.mouse().move(0, 0) -
Remove focus rings via CSS injection
Choosing the Right Comparator
| Scenario | Recommended Comparator | Threshold |
|---|---|---|
Cross-browser testing |
Perceptual Hash |
0.85-0.90 |
Same browser, CI/CD |
Perceptual Hash |
0.90-0.95 |
Pixel-perfect design |
Pixel |
1.0 |
Component screenshots |
Perceptual Hash |
0.90 |
Icon/logo verification |
Pixel |
0.99-1.0 |
Full page screenshots |
Perceptual Hash |
0.85-0.90 |
When in doubt, start with perceptual hash comparison. It provides a good balance between catching real regressions and avoiding false positives from rendering differences.
Custom Extensions — Your Own Scrubbers, Print Formats, and Reviewers
While ApproveJ ships with a range of built-in scrubbers, print formats, and file reviewers, you can create your own.
A custom scrubber lets you strip domain-specific dynamic data (e.g. email addresses, internal IDs) that the built-in scrubbers do not cover.
Custom print formats and file reviewers go a step further: by implementing the provider SPI, they integrate seamlessly with ApproveJ’s configuration system and can be set as global defaults via approvej.properties.
Custom Scrubber
The scrubbing chapter shows how to pass a lambda to scrubbedOf() for one-off cases.
When you want to reuse a scrubber across tests, implement the Scrubber interface as a class.
The Scrubber interface has three type parameters:
interface Scrubber<I extends Scrubber<I, T, R>, T, R>
    extends UnaryOperator<T> {
  // …
}-
T— the type of value being scrubbed (usuallyString) -
R— the type of the replacement value (usuallyString) -
I— the scrubber’s own type (a self-referential generic so thatreplacement()returns the correct type)
For the most common case — scrubbing strings — you can implement StringScrubber, which binds all three parameters to Scrubber<StringScrubber, String, String>.
This means you only need to implement two methods:
-
String apply(String value)— perform the actual scrubbing -
StringScrubber replacement(Replacement<String> replacement)— return a copy with a different replacement strategy
Here is a scrubber that replaces email addresses:
package examples.java;

import java.util.HashMap;
import java.util.Map;
import java.util.function.Function;
import java.util.regex.MatchResult;
import java.util.regex.Pattern;
import org.approvej.scrub.Replacement;
import org.approvej.scrub.Replacements;
import org.approvej.scrub.StringScrubber;

public class EmailScrubber implements StringScrubber { (1)

  private static final Pattern EMAIL_PATTERN =
      Pattern.compile("[a-zA-Z0-9._%+-]+@[a-zA-Z0-9.-]+\\.[a-zA-Z]{2,}");

  private final Replacement<String> replacement;

  public EmailScrubber() {
    this(Replacements.numbered("email")); (2)
  }

  private EmailScrubber(Replacement<String> replacement) {
    this.replacement = replacement;
  }

  @Override
  public String apply(String value) { (3)
    Map<String, Integer> findings = new HashMap<>();
    Function<MatchResult, String> replacer =
        result -> {
          String group = result.group();
          findings.putIfAbsent(group, findings.size() + 1);
          return String.valueOf(replacement.apply(group, findings.get(group)));
        };
    return EMAIL_PATTERN.matcher(value).replaceAll(replacer);
  }

  @Override
  public StringScrubber replacement(Replacement<String> replacement) { (4)
    return new EmailScrubber(replacement);
  }
}package examples.kotlin
import org.approvej.scrub.Replacement
import org.approvej.scrub.Replacements
import org.approvej.scrub.StringScrubber
class EmailScrubber private constructor(private val replacement: Replacement<String>) :
StringScrubber { (1)
constructor() : this(Replacements.numbered("email")) (2)
override fun apply(value: String): String { (3)
val findings = mutableMapOf<String, Int>()
return Regex("[a-zA-Z0-9._%+-]+@[a-zA-Z0-9.-]+\\.[a-zA-Z]{2,}").replace(value) { match ->
val group = match.value
findings.putIfAbsent(group, findings.size + 1)
replacement.apply(group, findings[group]!!).toString()
}
}
override fun replacement(replacement: Replacement<String>): StringScrubber { (4)
return EmailScrubber(replacement)
}
}| 1 | Implement StringScrubber to get the right type bindings |
| 2 | Provide a sensible default replacement |
| 3 | apply performs the actual scrubbing — find matches and replace them |
| 4 | replacement returns a new instance with the given replacement strategy, keeping the scrubber immutable |
Use it like any built-in scrubber:
approve("Contact jane@example.com or john@company.org for details.")
    .scrubbedOf(new EmailScrubber()) (1)
.byFile();approve("Contact jane@example.com or john@company.org for details.")
.scrubbedOf(EmailScrubber()) (1)
.byFile()Contact [email 1] or [email 2] for details.Because the scrubber implements replacement(), callers can swap the replacement strategy:
approve("Contact jane@example.com or john@company.org for details.")
    .scrubbedOf(new EmailScrubber().replacement(labeled("redacted"))) (1)
.byFile();approve("Contact jane@example.com or john@company.org for details.")
.scrubbedOf(EmailScrubber().replacement(labeled("redacted"))) (1)
.byFile()| 1 | replacement() returns a new scrubber — the original is unchanged |
Contact [redacted] or [redacted] for details.Custom Print Format Provider
The printing chapter shows how to pass a PrintFormat instance to printedAs().
If you want your custom print format to be usable as a global default via approvej.properties, implement both PrintFormat<T> and PrintFormatProvider<T>.
The provider SPI makes your format available by alias, just like the built-in ones.
-
Implement
PrintFormat<T>andPrintFormatProvider<T> -
Register via
META-INF/services/org.approvej.configuration.Provider
package examples.java;

import org.approvej.print.PrintFormat;
import org.approvej.print.PrintFormatProvider;
import org.approvej.print.Printer;
import org.jspecify.annotations.NonNull;

public class ScreamingPrintFormat implements PrintFormat<Object>, PrintFormatProvider<Object> {

  @Override
  public @NonNull String alias() {
    return "screaming";
  }

  @Override
  public PrintFormat<Object> create() {
    return new ScreamingPrintFormat();
  }

  @Override
  public Printer<Object> printer() {
    return (Object object) -> object.toString().toUpperCase();
  }

  @Override
  public String filenameExtension() {
    return "TXT";
  }
}package examples.kotlin
import org.approvej.print.PrintFormat
import org.approvej.print.PrintFormatProvider
import org.approvej.print.Printer
class ScreamingPrintFormat : PrintFormat<Any>, PrintFormatProvider<Any> {
override fun printer(): Printer<Any> = { any -> any.toString().uppercase() }
override fun filenameExtension() = "TXT"
override fun alias() = "screaming"
override fun create() = ScreamingPrintFormat()
}src/test/resources/META-INF/services/org.approvej.configuration.Providerexamples.java.ScreamingPrintFormatNow you can set it as the default in approvej.properties:
defaultPrintFormat = screamingCustom File Reviewer Provider
Similarly, you can create a custom file reviewer and register it via SPI to make it available as a global default.
-
Implement
FileReviewerandFileReviewerProvider -
Register via
META-INF/services/org.approvej.configuration.Provider
package examples.java;

import org.approvej.approve.PathProvider;
import org.approvej.review.FileReviewResult;
import org.approvej.review.FileReviewer;
import org.approvej.review.FileReviewerProvider;
import org.approvej.review.ReviewResult;
import org.jspecify.annotations.NonNull;

public class LoggingFileReviewer implements FileReviewer, FileReviewerProvider {

  @Override
  public ReviewResult apply(PathProvider pathProvider) {
    System.out.println("Received: " + pathProvider.receivedPath());
    System.out.println("Approved: " + pathProvider.approvedPath());
    return new FileReviewResult(false);
  }

  @Override
  public @NonNull String alias() {
    return "logging";
  }

  @Override
  public FileReviewer create() {
    return new LoggingFileReviewer();
  }
}package examples.kotlin
import org.approvej.approve.PathProvider
import org.approvej.review.FileReviewResult
import org.approvej.review.FileReviewer
import org.approvej.review.FileReviewerProvider
import org.approvej.review.ReviewResult
class LoggingFileReviewer : FileReviewer, FileReviewerProvider {
override fun apply(pathProvider: PathProvider): ReviewResult {
println("Received: " + pathProvider.receivedPath())
println("Approved: " + pathProvider.approvedPath())
return FileReviewResult(false)
}
override fun alias() = "logging"
override fun create() = LoggingFileReviewer()
}META-INF/services/org.approvej.configuration.Providerexamples.java.LoggingFileReviewerNow you can set it as the default in approvej.properties:
defaultFileReviewer = loggingBuild Plugins — Manage Approved and Received Files
When you rename or delete a test method, its approved file stays behind on disk. Over time these leftover files accumulate and clutter the repository.
ApproveJ provides build plugins for Gradle and Maven that help you clean up leftovers, batch-review unapproved files, and approve received files across the project. These plugins use an inventory that ApproveJ maintains automatically during test runs.
Setup
Gradle Plugin
plugins {
  id 'org.approvej' version '1.5.1'
}plugins {
id("org.approvej") version "1.5.1"
}| The plugin requires the Java plugin to be applied in the same project. |
Maven Plugin
<plugin>
  <groupId>org.approvej</groupId>
  <artifactId>approvej-maven-plugin</artifactId>
  <version>1.5.1</version>
</plugin>
Clean Up Leftover Files
An approved file is considered a leftover when its originating test method no longer exists in the compiled test classes.
# Gradle
./gradlew approvejFindLeftovers  # list leftovers without deleting
./gradlew approvejCleanup        # find and remove leftovers

# Maven
mvn approvej:find-leftovers
mvn approvej:cleanup
A typical cleanup workflow:
-
Run your tests locally so the inventory is populated.
-
Run the find-leftovers task/goal to see which approved files are leftovers.
-
Run the cleanup task/goal to delete the leftover files.
-
Commit the updated inventory and the removal of leftover files.
| Only approved files that have been recorded in the inventory can be detected as leftovers. Make sure you have run all relevant tests at least once before cleaning up. |
Review Unapproved Files
After running your tests, some may have failed because the received value differs from the approved value. Instead of reviewing each failure individually, you can open all unapproved files in the configured default file reviewer at once.
# Gradle
./gradlew approvejReviewUnapproved

# Maven
mvn approvej:review-unapproved
This scans the inventory for approved files that have a corresponding received file and opens each pair in the file reviewer.
Approve All Received Files
If you are confident that all received files are correct, you can approve them all at once. This moves every received file to its corresponding approved file, replacing the previous content.
# Gradle
./gradlew approvejApproveAll

# Maven
mvn approvej:approve-all| This overwrites all approved files with their received counterparts without review. Make sure you check the changes before committing them to version control. |
The Approved File Inventory
The build plugin tasks rely on an inventory file that ApproveJ maintains automatically.
Every time a test calls byFile(), ApproveJ records the approved file path and the originating test method.
At the end of the test run, all entries are merged into a project-level inventory file:
.approvej/inventory.properties
The file uses Java Properties format. Each entry maps a relative file path to the test reference that created it:
src/test/resources/MyTest-myTest-approved.txt = com.example.MyTest#myTest
Commit .approvej/inventory.properties to version control so that the inventory is shared across the team.
|
The inventory is updated incrementally. Only entries for test methods that ran in the current execution are refreshed. Entries for tests that did not run are preserved.
Disable the Inventory
The inventory is controlled by the inventoryEnabled property.
| Environment | Default |
|---|---|
Local development (no |
|
CI (the |
|
You can override this default in any configuration source:
src/test/resources/approvej.propertiesinventoryEnabled = trueOr via environment variable:
export APPROVEJ_INVENTORY_ENABLED=falseIntelliJ Plugin — IDE Integration
The ApproveJ IntelliJ plugin is an optional plugin that enhances the approval testing workflow directly in IntelliJ IDEA. It provides integrated diff viewing, one-click approval, bidirectional navigation between test code and approved files, and inspections for common mistakes.
Installation
Install the plugin from the JetBrains Marketplace:
-
Open Settings → Plugins → Marketplace.
-
Search for "ApproveJ".
-
Click Install and restart the IDE.
Diff Viewer and One-Click Approval
When a test produces a .received file, the plugin shows a banner at the top of the file with actions:
-
Compare with Approved — opens a side-by-side diff between the received and approved file.
-
Approve — copies the received file over the approved file in one click.
-
Navigate to Test — navigates to the test method that produced the file.
Similarly, when an approved file has a pending received file, its banner offers a Compare with Received action.

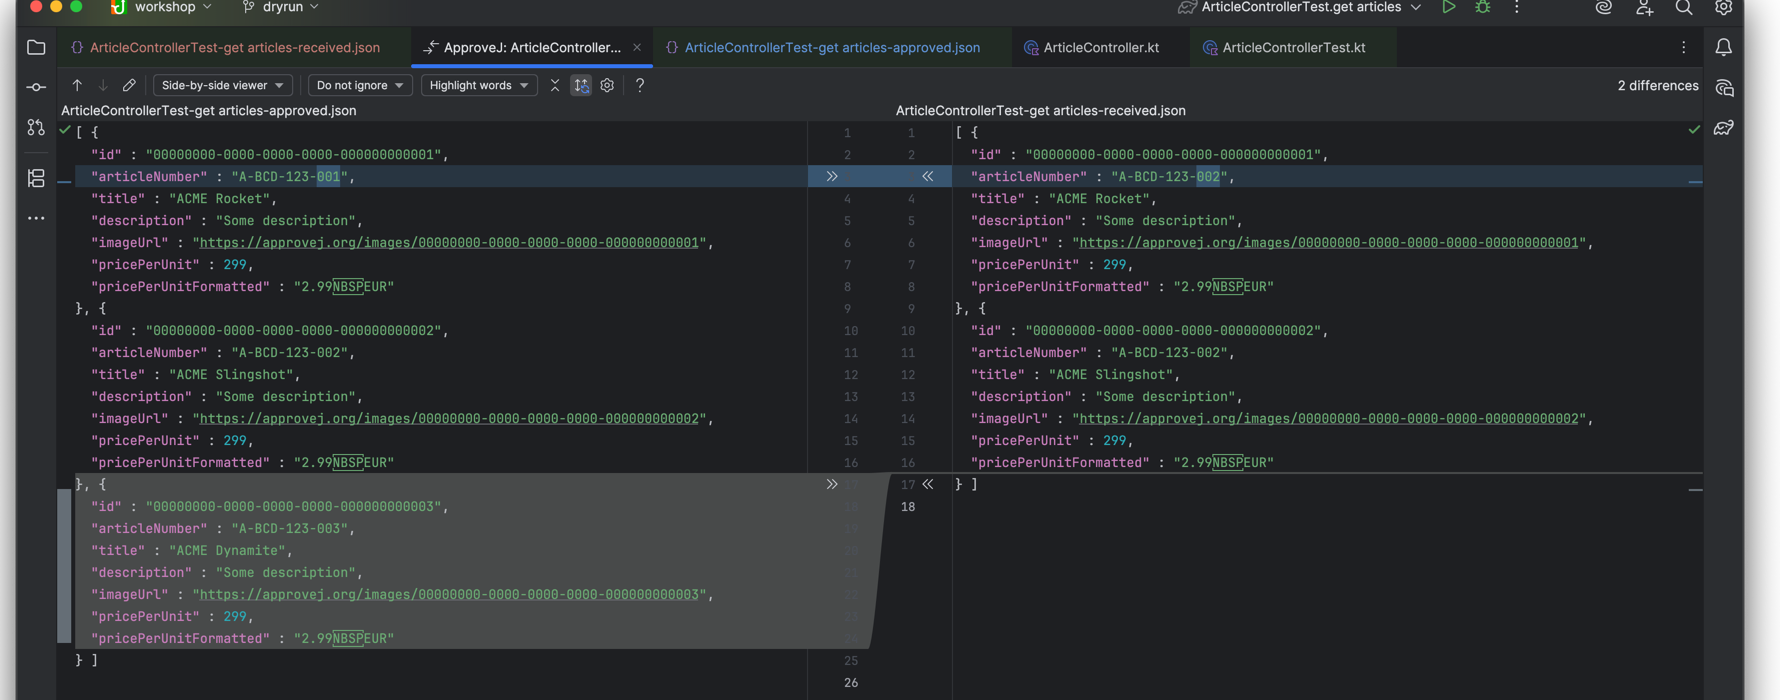
These actions are also available from the context menu on .received files in the project tree.
Navigation
The plugin provides bidirectional navigation between test code and approved files:
-
Test → Approved file: A gutter icon appears next to
approve()…byFile()call chains. Click it to navigate directly to the corresponding approved file. -
Approved/Received file → Test: Banners on approved and received files offer a "Navigate to Test" action that navigates back to the
approve()call.
approve() call chain linking to the approved file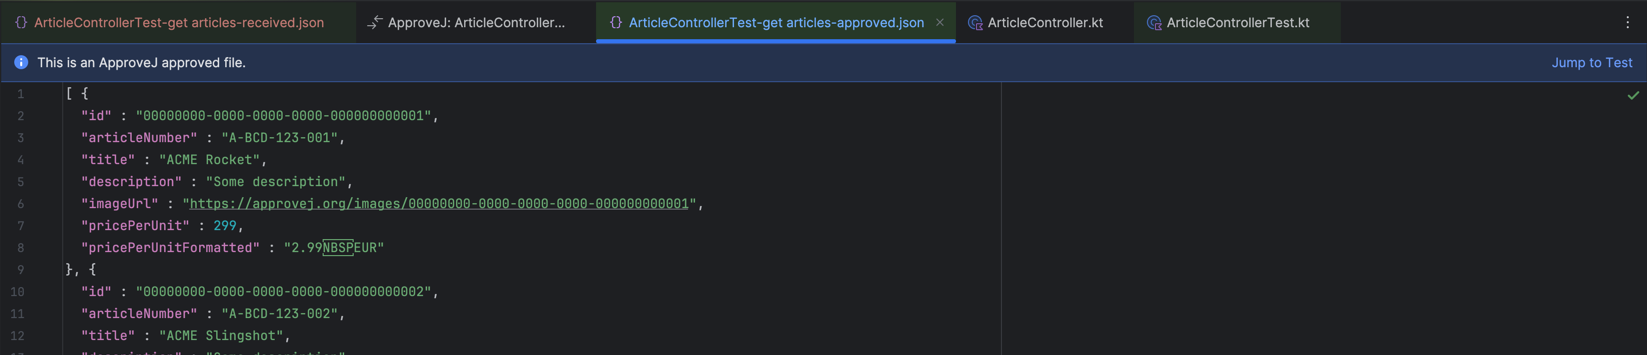
Dangling Approval Inspection
The plugin warns you when an approve() call is missing its terminal method (like byFile() or byValue()).
Without a terminal method, the approval is never actually executed — the test silently passes without checking anything.
The inspection offers quick fixes to add a terminal method:
-
.byFile()— file-based approval (most common) -
.byValue("")— inline approval with an empty expected value
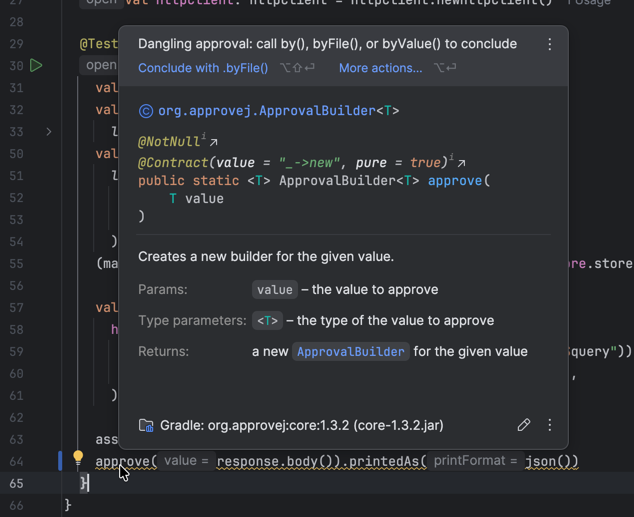
Figure 5. Inspection warning on a dangling approve() call
|
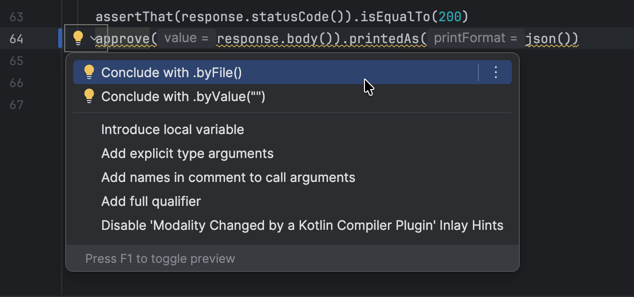
Figure 6. Quick fixes to conclude a dangling approval
|
Configuration — Global Defaults and Environment Settings
ApproveJ can be configured through multiple mechanisms to customize its default behavior. This allows you to set global defaults, override them per project, and further override them via environment variables.
Configuration Sources
Configuration values are resolved in the following order (highest to lowest priority):
-
Environment variables - e.g.,
APPROVEJ_DEFAULT_PRINT_FORMAT -
Project properties file -
src/test/resources/approvej.properties -
User home properties file -
~/.config/approvej/approvej.properties -
Default values
This hierarchy allows you to:
-
Set global defaults in your home directory
-
Override them per project in the project’s properties file
-
Further override them via environment variables (useful for CI/CD pipelines)
See the cheat sheet for a complete list of all supported properties.
SonarQube / SonarCloud
SonarQube’s rule S2699 ("Tests should include assertions") may report false positives on approval tests because it does not recognize byFile() or byValue() as assertion methods.
To fix this, configure the customAssertionMethods parameter on rule S2699 in your quality profile.
Add the following entries:
org.approvej.ApprovalBuilder#byFile,org.approvej.ApprovalBuilder#byValue,org.approvej.ApprovalBuilder#by,org.approvej.image.ImageApprovalBuilder#byFileIn SonarCloud, go to Quality Profiles → your Java profile → find rule S2699 → click Change → set the customAssertionMethods parameter.
In SonarQube Server, go to Quality Profiles → your Java profile → Activate More Rules → search for S2699 → configure the parameter.
We have requested that SonarSource add approve to the built-in assertion method pattern.
If that is accepted, this configuration will no longer be necessary.
|
Cheat Sheet
Quick reference for the ApproveJ public API, organized by the approval flow.
| A printable PDF version of this cheat sheet is available. |
Entry Point
| Method | Description |
|---|---|
|
Start building an approval for a value |
|
Set a custom name for the approval (used in filenames) |
|
Convert value to string using a |
|
Convert value to string using a custom function |
|
Convert value to string using the default print format |
|
Apply a scrubber to remove dynamic data |
|
Set the file reviewer for this approval |
|
Set a review script for this approval |
|
Approve against an inline string |
|
Approve against a file next to the test |
|
Approve against a file at a custom path |
|
Approve against a file at the given path |
|
Approve against a file at the given path string |
|
Approve using a custom approver function |
Print Formats
| Factory Method | Description |
|---|---|
|
Print via |
|
Print each property on a new line |
|
Same as above but with sorted properties |
|
Pretty print as JSON (requires |
|
Pretty print as JSON with a custom |
|
Print as YAML (requires |
|
Print as YAML with a custom |
|
Print as HTTP request format (requires |
|
Print as Markdown table (requires |
|
Pretty-print SQL with line breaks (requires |
Scrubbers
String Scrubbers
| Factory Method | Description |
|---|---|
|
Scrub specific string values |
|
Scrub strings matching a regex pattern |
|
Scrub strings matching a regex string |
|
Scrub UUID strings |
Date/Time Scrubbers
| Factory Method | Description |
|---|---|
|
Scrub dates matching a |
|
Same with a specific locale |
|
Scrub ISO local dates ( |
|
Scrub ISO offset dates |
|
Scrub ISO dates |
|
Scrub ISO local times ( |
|
Scrub ISO offset times |
|
Scrub ISO times |
|
Scrub ISO local date-times |
|
Scrub ISO offset date-times |
|
Scrub ISO zoned date-times |
|
Same with a specific locale |
|
Scrub ISO date-times |
|
Same with a specific locale |
|
Scrub ISO ordinal dates |
|
Scrub ISO week dates |
|
Scrub ISO instants |
|
Scrub basic ISO dates ( |
|
Scrub RFC 1123 date-times |
Field Scrubbers
| Factory Method | Description |
|---|---|
|
Scrub a field value on objects of the given type |
JSON Scrubbers
| Factory Method | Description |
|---|---|
|
Scrub a JSON node at the given JSON Pointer path |
HTTP Scrubbers
| Factory Method | Description |
|---|---|
|
Scrub an HTTP header value by name |
|
Scrub the |
|
Scrub the |
Database Scrubbers
| Factory Method | Description |
|---|---|
|
Scrub all values in a column by name (case-insensitive) |
Replacements
| Factory Method | Description |
|---|---|
|
Replace with |
|
Replace with numbered placeholder using default label |
|
Replace with |
|
Replace with a fixed string |
|
Replace with relative date (e.g. |
|
Replace with relative date-time |
|
Mask characters ( |
Approvers & Path Providers
| Factory Method | Description |
|---|---|
|
Place files next to the test class (default) |
|
Place files in a subdirectory named after the test class |
|
Use a specific approved file path |
|
Use a specific approved file path string |
File Reviewers
| Factory Method | Description |
|---|---|
|
Do nothing on mismatch (default) |
|
Automatically accept all received values |
|
Run a script with |
Build Plugin Tasks
| Command | Description |
|---|---|
|
List leftover approved files (Gradle) |
|
Remove leftover approved files (Gradle) |
|
Approve all unapproved files (Gradle) |
|
Review all unapproved files (Gradle) |
|
List leftover approved files (Maven) |
|
Remove leftover approved files (Maven) |
|
Approve all unapproved files (Maven) |
|
Review all unapproved files (Maven) |
Configuration Properties
| Property | Environment Variable | Default |
|---|---|---|
|
|
|
|
|
|
|
|
(none) |
|
|
|
Configuration is resolved in priority order: environment variables > project properties (src/test/resources/approvej.properties) > user home properties (~/.config/approvej/approvej.properties) > defaults.
API Reference
Javadoc for each module is available here:
-
core — core framework
-
http — HTTP stub server
-
http-wiremock — WireMock adapter
-
json-jackson — JSON support (Jackson 2.x)
-
json-jackson3 — JSON support (Jackson 3.x)
-
yaml-jackson — YAML support (Jackson 2.x)
-
yaml-jackson3 — YAML support (Jackson 3.x)
-
database — database state snapshotting